In late 2018 I decided I wanted to get into USPSA, specifically Carry Optics. I had built a
Glock 34 but didn't get a chance to shoot my first real match until early 2019. By May, I had shot enough classifiers to find myself knocking on B class. I realized that sporadic dry-fire and listening to podcasts wasn't going to get me into A class anytime soon. I built a dry-fire practice range in my office and started looking into dedicated competition gear.
 |
| Dry-fire Range. Nerf for the kiddos...and me. |
I showed up to my next match with a Shooter's Connection double belt, Double Alpha Academy mag pouches, and a Blade-Tech G34 holster on a BOSS hanger. Unfortunately, all my shiny gear couldn't save me from a lot of mental errors. In one stage, I had a stovepipe, skipped a reload, and ran dry in the middle of an array. More dry-fire and Steve Anderson's "match mode" practice was in order. On the equipment side, my 21-round Magpul magazines had become unreliable. I was getting multiple stovepipes per match, and having two fewer rounds than the CZ guys was occasionally handicapping my stage plans. I remember looking longingly at the Shadow2s and 2011s of my fellow competitors.
Now, my unofficial motto is "why practice when you can just buy new gear?" I needed to replace my Magpul mags with OEM 17-rounders and EGW +5 extensions. But spending $300 on five magazines meant it was time to clean out the safe and free up some cash. When I took my seldom shot P-07 to my LGS to ship it off to its new owner, I spotted an SP-01 Tactical in the display case. The clerk told me it was a used SP-01 Tactical coming off the range rental program for $350. It looked like it had hardly been shot (why would anyone rent this when there's a Shadow2 hanging next to it?) and I figured I could get some go-fast parts from Cajun Gun Works with the money I saved. Worse case, it would be a fun experiment. One 4473 later and the SP-01 was heading home. Right off the bat I bought two more mags and 140mm extensions from CZC. From Cajun Gun Works, I ordered their Pro trigger kit, 10X bushing, stainless guide rod, Shadow2 mag release, and an assortment of recoil and hammer springs. I needed a holster, so one from RedHill fit the bill. Last, I ordered a set of LOK grips and a G10 mag button to finish it out. This may have been an experiment, but I wanted to give it the best chance to succeed. There would be no half-measures taken.
 |
| Coming home. |
After a lot of stoning, wet sanding, and polishing of the internals, I got the DA slicked down to just under 6lbs and the SA trigger to 2lbs 10oz. Unlike a striker-fired gun, getting eveything flat and smooth was a lot more tedious. The rage inducing "D" sear cage assembly took quite a few online tutorials to figure out. But the biggest problem was getting an optic mounted. My first choice was the Trijicon RMR. But the wide mounting hole spacing meant an adapter plate would be needed. Unfortunately, I couldn't find any place that would mill one low enough for my liking. My plan was to start with the RMR, then switch to an SRO when they were released. I wanted the optic mounted as low as possible since the SRO's window sits higher than the RMR. I could've made my life easier by going with a DeltaPoint Pro, but I wanted the robust electronics of the Trijicon offerings. To tide me over, I picked up a Springer Precision dovetail mount and hit the range.
 |
| Carry Optics guns. LOK CZ-75 Palmswell Grips. |
The shot beautifully...for the first magazine. Then the groups started opening up. Even from a rest I couldn't keep my shots in the black from seven yards. I was confused because I had fired it with the iron sights and had no accuracy problems. When I got home, I tore into the pistol. As it turns out, the mount was loose. Even though it had required several taps from a nylon hammer to get installed, the aluminum mount was loose in the rear dovetail despite only shooting minor PF loads. The tiny setscrews just didn't have enough bite to keep the mount steady. I also didn't like how high the optic sat, and I didn't want to have to re-learn my draw and index to accommodate a plate that looks like an afterthought. Most companies required a Trijicon 1911 adapter plate for RMR mounting. Not only did this add $200 to the cost of an already $300 job, but the plate has tritium rear sights and the optic sits nearly level with the top of the slide. Both were a no go for me. CZC has a custom plate setup that sits pretty low, but I wanted a gap free mount. I realized that the only way I was going to be happy would be to do it myself. First I took a bunch of slide measurements, then drew up a quick diagram. After a lot of math, I realized I could cut slightly into the FP retainer pin channel since I'd swapped the roll pin for a CGW slotted pin. Then I made a mock slide and milled a pocket to test my CNC programming skills.
 |
| 2nd of 5 revisions. |
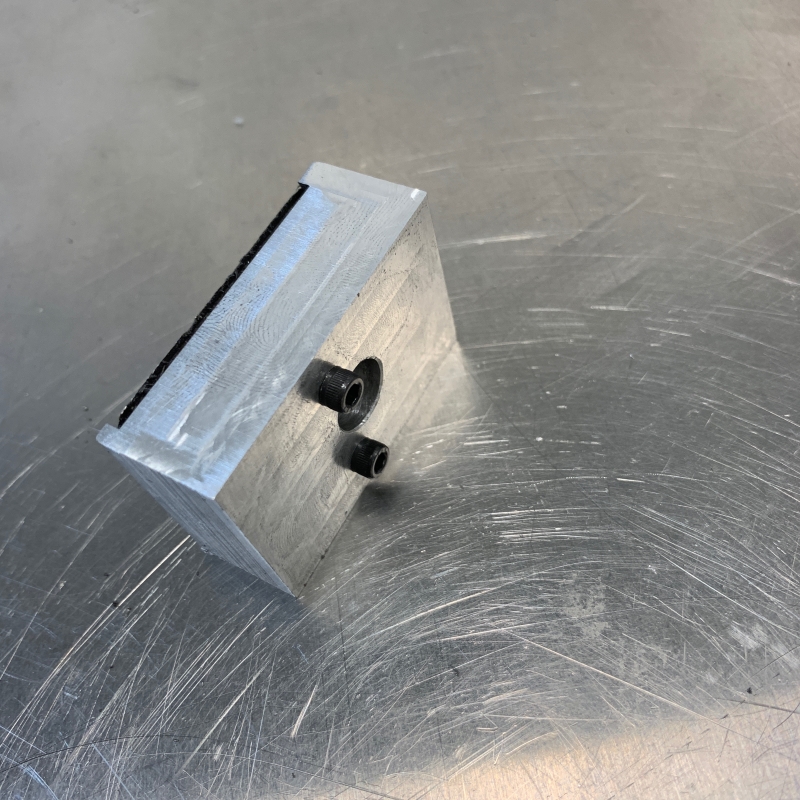
Confident my design was sound, I bought a
Trijicon gunsmith RMR mount. But before I could start milling, I had to make a jig that mirrored the mounting screws and recoil lugs. Otherwise, there was no way to hold the plate in the vise as I thinned it. With the plate firmly bolted to the jig, I milled the steel block to 0.110", just thick enough to give the RMR mounting screws the minimum three full turns of thread engagement. Using the CNC, I located the four mounting screw holes and countersunk them for M3 screws.


I then milled the pocket into the slide, and drilled and tapped the mounting screw threads. I chose M3 screws because they were small enough to stay well clear of the internal channels in the slide, and the fine threads would resist vibration. With four of them holding the slide, plus the tight fit of the pocket, I'd have a rock-solid mount for my optic. One issue I had was with the FP block. I couldn't disable it and be USPSA legal, so I extended the tunnel into the mounting plate, and used the bottom of the optic to contain the spring. The end result was an RMR mounted to the same depth as my milled Glocks.
 |
| LOK Shadow2 Palmswell Grips |
The last step was to mill cocking serrations into the plate. The front serrations were too short, too shallow, and too far to the rear to use reliably for unloaded starts. I prefer not to use the optic body as a slide racker, so milling rear serrations was the best choice. I chose to use the same depth and spacing as my Glocks. Then I shipped the slide and plate to
Mac Defense for Cerakote and started figuring out my grips. Originally I ordered LOK CZ-75 Palmwells, but I didn't like how wide they were at the top. I contacted LOK, and they recommended Shadow 2 Palmswells. They made it easy to exchange my grips, but I still wasn't 100% happy with them. The fit and finish were excellent, but the upper portion of the grip was meant for models with a thumb safety and didn't extend very far up the slide of the gun, so my support palm was landing in the smooth space between the slide release and grip panel. Again, I contacted LOK and asked if I could get a custom panel made. They told me I could just order Shadow2 grips with "high top" written in the order comments. They even let me exchange my grips again! By the time my 3rd set of grips arrived, my slide and plate were back from MAC Defense.
 |
| LOK Shadow2 Palmswells with "High Top" |
While reassembling the slide and fitting the 10X bushing, I installed a Dawson fiber optic front sight, not really as a backup, but to keep the bushing retaining pin in place. Plus, occasionally a stage will call for not only weak-hand shooting, but weak-hand from an odd shooting position, like a low port or awkward lean. I sometimes lose the dot while getting into these positions, so having a front sight I can use like a shotgun bead helps me orient my gun. With target focused shooting, the front sight is out of focus, and the green rod could never be confused for the optic's much brighter red dot.
 |
| Fiber Optic Front Sight, 10X Bushing, and SS Guide Rod |
With everything squared away and lubed, I hit the range. Compared to the G34, this feels like cheating. The DA pull will take some getting used to, but having a sub 3-pound trigger means I barely have time to think "shoot" in my mind before the gun fires. One thing I have to learn is prepping the trigger. In DA I'm allowed to shoot from half-cock since I have a decocking lever, but it's very easy to blow past the trigger and touch off a round early. In SA, I have to be careful taking up the slack, especially when moving into an array. Take-up is about 2lbs due to the FP safety lifter, so it's a challenge to not apply more than 12oz when I feel the wall. A few times I've blown past the wall and fired a Delta before the dot was centered in the A zone. I need to unlearn some habits after shooting striker guns all these years.
 |
| Much better. |


Update: I shot my SP-01 in one match before my SRO arrived. Compared to my Glock 34, I saw a slight increase in transition times. This was to be expected since the steel framed CZ weighs over a pound more than the Glock, but the extra weight didn't really help my splits. Also, I was still getting the occasional stove pipe or failure to chamber. Rounds ejected 6-8 feet away to exactly 3 o'clock and the dot was tracking true, so it wasn't a springing or ejector/extractor issue. As it turns out, CZ cuts the barrel for European CIP instead of SAAMI specs, so the leade is cut shorter. My 147gr 1.130" OAL loads weren't passing the plunk test. I gave the barrel a few turns with a throating reamer, until even 1.140" rounds would chamber freely. I shot the next 3 matches with the SRO installer, and made it into B class. But despite the gun shooting well, a few things still bug me. The magwell opening is a bit narrow, and there isn't much material to open it up like on a Tanfo. I caught the feed lips and case rim on the edges of the opening a few times. The Glock seemed to swallow even the most panicked reloads. Also, the trigger reach is still pretty short for my hands. I installed the thicker #5 trigger from CGW, but I still feel like I have to curl my trigger finger at an unnatural angle to run the gun fast. But the biggest thing is the weight. It just feels slow moving target to target, and transitions are where a lot of time can be saved, even more so than splits. I'm just nitpicking of course. All these things can be mitigated with practice, but I'm the type of person who is never satisfied with my gear. Still, I've increased my dry-fire to three weekly sessions and I'm starting to see a lot of my work come together. My progress is such that the Glock 34 is with a new owner now...if only to make room for a P10F.
 |
| Throating the barrel with a deeper leade. |