 |
| New guns, old fashioned |
Ever since I was a kid, I’ve been fascinated with the Old
West. The idea of rugged people,
striking off into untamed wilderness has always resonated with me.
A few years ago, I purchased a stainless Ruger New Vaquero
in .357 magnum. Out of the box, cocking
the hammer felt gritty and the trigger wasn’t nearly as crisp as my 1911s. With the help of forums, Youtube, and my own
limited engineering abilities, I slowly began to understand the inner workings
of the action, and what needed filing, stoning, or smoothing. Today, the action is buttery smooth with a
trigger pulling just under 3 pounds. The
modern “Peacemaker” satisfied my cowboy fantasies (phrasing!) until I handled a
friend’s lever action .22. Hearing and
feeling the metal parts interact as I worked the lever was supremely satisfying,
like changing gears in a manual transmission Porsche, or snapping together
brand new Lego bricks. I knew I had to
have one.
 |
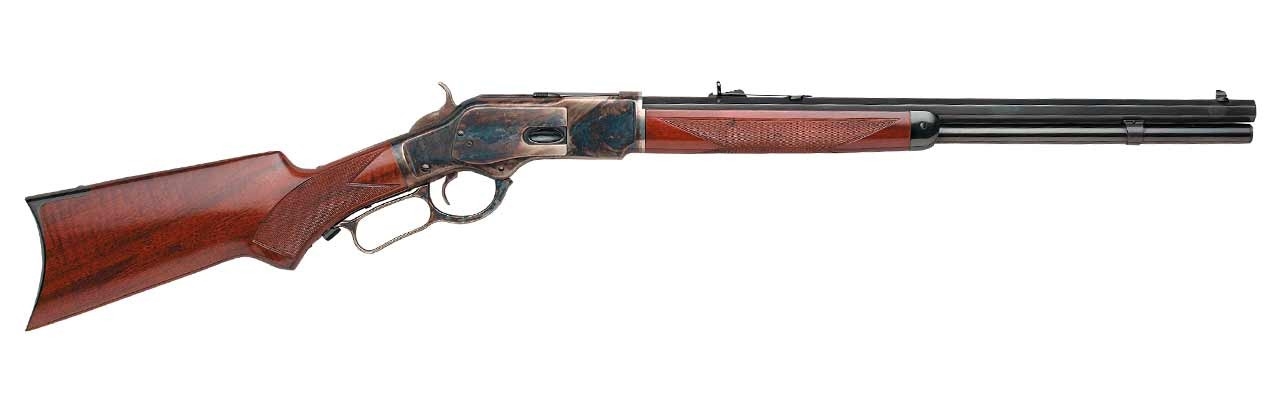
| Uberti 1873 Trapper .357 18.5" |
I decided on .357 to match my Vaquero, and I wanted a
loading gate, but those were the only easy decisions. I was new to lever actions. 1866, 1873, 1892, 1894? I spent a few weeks popping in to area gun
and pawn shops looking for examples of pistol caliber lever actions to try, but
they are rare as hen’s teeth around me. After
exhaustive research I settled on an 1873.
At the end of the day, the 1873 is the definitive “gun that won the
west”, and thousands of top SASS shooters swear by them. Aftermarket support is plentiful as are spare
parts. Unlike modern guns, 19th
century designs contain a lot of pieces that will wear out under moderate
use. They were engineered during a time
when people actually maintained their equipment, instead of throwing them out
like cellphones and TVs. Knowing that
I’d have to put some work into the gun, I decided to buy an 18.5” Uberti
Trapper. I wanted the easy handling of
the shorter barrel, but the weight of the octagonal barrel to stabilize the
rifle as I work the lever. The pistol
grip stock is heavier than the straight stock, shifting the balance slightly to
the rear, and the factory checkering on the grip and forend are a plus. Its 10 round capacity makes it usable in
SASS if I ever get the urge, and go-fast parts are available and well
documented. I also debated on the new
Winchester reproductions. While they’re
better made, many of the parts aren’t compatible with the original 1873.
 |
| It has that new rifle smell. |
I stopped in at a smaller gun store near my work,
Poppie’s
in Salisbury NC, and placed an order to their distributor. Four days later I got the call to pick up my
rifle. I pulled the gleaming steel from
the box, admired the (faux) color case finish, and worked the lever. Ugh.
It was gritty, heavy, long, and clunky throughout the stroke. When I
measured the trigger at home, it broke at over 7 pounds. Fortunately, I knew all of this was normal for the Italian copies. The first thing I
did at home was completely disassemble the rifle and thoroughly clean every
nook and cranny of leftover machining oil, metal shavings, and other
debris. I also thoroughly cleaned out
the magazine tube and ran a boresnake down the barrel. While my magazine spring was fine, many have
reported rusty mag springs because Uberti sometimes doesn’t wash the parts
after bluing, leaving bluing salts behind to rust any bare steel. At long last, I finally got to see the inner
workings of the toggle-link action myself. The idea is simple, but the interactions of all the parts is complex. Changing one dimension can
effect several parts down the line and throw off the timing. After a few hours, I had a clear picture of
how the mechanism worked, lightly lubed everything but the brass carrier with
Slip2K, and reassembled the gun. I then
installed a Palo Verde leather lever wrap.
Unfortunately, I broke the provided synthetic lacing trying to get it
tight with pliers so I substituted some synthetic waxed sinew from a crafts store.
 |
| These are spare parts now. |
That weekend, I grabbed a box of 158gr .38 special and hit
the range. I loaded a single round and
worked the still stiff lever. The round
reluctantly chambered but ejected cleanly after firing. After a few rounds at 25 yards, I was
rewarded with a nice clover leaf.
Satisfied, I loaded up the magazine to full capacity. The last 2 rounds fought me as I tried to
slip them past the loading gate, but I managed to stuff 10 rounds into the
tube. I fought the urge to shoot fast
and deliberately worked the lever between shots. While I could’ve shot more than 50 rounds, I
wanted to start preventative maintenance as soon as possible. The heavy springs and rough internals create
a lot of wear so the sooner I addressed them the better. Nearly every surface, part, and pin had a
rough spot or sharp edge that needed to be taken care of.
First, I broke out a 600 grit diamond file and began taking
down every burr inside the frame. I
lightly stoned the flats to reduce but not eliminate the tooling marks,
careful not to change any dimensions or angles.
I hand/finger sanded a few areas like the bolt channel. I taped a piece of 800 grit sandpaper to a
dowel, wet it down with oil, and chucked it into my cordless drill. I then very lightly sanded the burrs out of
the firing pin extension channel. I
smoothed off the corners of the trigger spring and gave it a light polish with
liquid Flitz and a felt drum in my 20 year old Dremel. Every pin received a light sanding with wet
800 grit sandpaper and hand polishing with more Flitz. I cleaned up the tool marks on the insides of
the cover plates with wet 600 grit paper on a marble tile sample. Then I broke into my assortment of parts.
 |
| Cleaning up the interior with a #600 diamond file |
Even before I had the rifle in my hands, I had ordered
several go-fast parts. I chose to
purchase aftermarket parts to reduce the time I’d have to spend tuning and to
have factory spares. For the trigger, I
swapped in a reduced hammer and lever safety spring. I cleaned up the sides of the sear with wet
800 grit, and dressed the nose of the sear with an x-fine ceramic stone. A 10x jewelers loupe and good lighting
ensured I didn’t alter the sear geometry.
I used the same stone to square up the hammer hooks. I also flattened out the curve of the trigger spring to reduce the pull weight and polished the sides and tip where it rests on the sear. Reassembled and lubed, the trigger broke at a
pleasant 3 lbs with zero grittiness while thumbing the hammer.
 |
| Go-fast goodies. |
 |
| Sear nose trued and trigger spring polished. |
 |
| Squaring the hammer hooks |
Next I moved on to the brass carrier. After studying the part, I worked out areas
that I could safely lighten. I used a
radiused endmill to cut 0.080” deep pockets in the sides, and cut slots in the
lifter tunnel. I could’ve removed more
but I didn't want any modifications to be visible from outside the gun. I then milled a radius into the forward portion of the carrier in preparation for the C&I short stroke kit. By the end, I got the 3.9 oz carrier down to 3 oz even. I decided on a 3rd gen kit because
it didn’t require an aluminum carrier.
I’m not out to win any speed records so I don’t need the shortest
stroke, and the slippery nature of brass is less likely to get hung up by
fowling or wear out as quickly as aluminum.
I finished off the carrier by wet sanding the flats with 800 grit on my
marble tile.
 |
| Milled carrier - right |
 |
| Milled carrier - left |
 |
| Radiused corners for short stroke kit |
The short stroke kit took the most time, mainly filing the
pad on the lifter to set the timing. But
first I had to address the lobe on the lever.
Uberti cuts the lobe at an angle, so only the outside edge contacts the
lever spring. This wears a groove in the
spring and isn’t as efficient or smooth as a wider area. With my Dremel and a stone, I ground the lobe
perpendicular to the lever face, careful to follow the existing contours. I polished the lobe with a felt wheel and
installed the “Whipser” springs. Unlike
the factory flat springs which are stiff enough to use in the suspension on a
stagecoach, the Whisper springs use rounded spring steel rods. Unlike Slix springs, they are captured in a
groove under the spring carrier. Since
they are sandwiched between the carrier and frame, they can't accidentally slip
out. They arrived pre-bent and the tips
were already polished smooth.
 |
| Factory lug not cut square |
 |
| Lug after reshaping and polishing. Whisper spring leg rests flat. |
 |
| Whisper Springs |
Next I had to bend the lever until the tip of the lever
touched the frame just as the carrier bottomed out flush with the
receiver. I mounted the lever in my vise
and after a few cycles of bending and testing, got the lever dialed in. Then came the tedious part. I had to file the pad on the lifter to set
the timing. This is a critical
step. It ensures the bolt is clear
before the carrier raises the next cartridge into position. There is a very small margin of error. If you don’t file enough, the rim will snap
the thin tab off the bolt. Too much and
the lever will reach its limit of travel before the carrier is fully up. I knew I’d have to remove at least 3/16” of
material so I started with a Dremel, grinding off the pad up to the 1/8”
mark. Then I leveled the surface with a
bastard file before switching to a #2 swiss file with a safe edge. The tricky part is keeping the surface both
flat and inline with the pivot pin. It
was slow going, taking nearly 2 hours.
Everytime I wanted to check the fit, I had to reinstall the lifter and
lever springs. Eventually I gouged up
the soft lifter/lever screws even with properly fitting gunsmith bits. Fortunately, I thought ahead, and had a
hardened pair ready for when I was done.
When I was satisfied, I polished the flat to provide a square surface
for the lever lug to hit, and to look nice since it’s visible from the
outside.
 |
| Bending the lever |
 |
| Fitting the timing pad |
 |
| Looks good |
 |
| Short throw kit reduced throw by 25% |
Reassembled, I worked the action. The difference was dramatic. I could work the lever with one finger, and
the reduced throw felt like the Henry .22 that inspired me. There was still some grittyness somewhere in
there though, so I went back to work. I
dressed every sharp edge on the bolt, and polished the wearing points. I replaced the firing pin extension with a
lightweight version. The lighter weight
ensures that the now lightened hammer can still transfer enough energy to pop
the primer. The rear where it contacts
the hammer is rounded for easier cocking and was polished. I had trouble getting the retaining piece in
though. As it turns out, the retainer
needs to be modified, but no instructions were provided. Happily, the manufacturer had instructions
posted on their website. I few minutes
with a Dremel and file was all it needed.
 |
| Smoothing the rough edges on the bolt |
 |
| Rounded edges reduce cocking effort |
 |
| Modified retainer |
Next, the King’s loading gate need some tweaking. I adjusted the arm to reduce the tension
slightly, then filed a relief cut in the receiver where the rounds were hanging
up when inserted. I also smoothed a
portion of the frame where the gate was snagging and filed a relief cut where the rim of the
round would sometimes catch.
 |
| Rotating parts get oil. Sliding parts get grease. |
I wrapped everything up by quickly polishing the inside of
the toggle tracks and adding a dab of Slip2K grease on the sliding bits. Now it’s incredibly smooth. Despite all of the pieces moving about, it
feels like it has fewer moving parts than a bolt action, and the front sight
moves substantially less when working the lever from my shoulder.
Speaking of shoulders, I knew the crescent stock would have
to go as soon as it poked mine. The
curved buttplate is designed to rest against the outside of the shoulder, near
the bicep. The shooter stands upright
with an Olympic style grip, bladed to the target, with the strong arm “chicken
winged” out to the side. This is stable
and pretty comfortable but not ideal when you want to sling lead. Ideally, the buttstock rests inside the
shoulder pocket close to the pectoral muscle.
This way, as your arm moves to work the lever, the outer shoulder isn’t moving
the gun around. But the bottom point of
the aggressive curve digs into the shoulder.
While this is great when butt-striking a cattle rustler in the face, it
sucks for shooting at speed. At first I
wanted to buy a carbine stock and add a leather cover, but I’d have to purchase
a straight tang to replace the curved one for the pistol grip as well. I’d also have to buy a matching forend and
fit and refinish both. In the end, I
decided to just chop the stock and add a recoil pad. I decided to cut the stock square with the
top of the comb, just far back enough to clear the curve of the buttplate with
a bandsaw. Then I removed the curved
potion of the metal buttplate on a scroll saw.
I reinstalled the remaining top corner of the buttplate, and leveled
everything out on a belt sander.
 |
| Buttstock chopped |
For the recoil pad, I chose a ½” thick Pachmayr RP-200. It’s
harder rubber than sorbothane pads, but the recoil from a .38 special is a
hamster fart. After chopping the stock,
it would be about 4 ½” tall and less than 1.4” wide so I went with the smallest
size. The pad doesn’t have a metal
insert which in most cases, is wider than the 1873 stock. Chopping the stock removed about ¾” from the
length, so the ½” Pachmayr pad would get most of that back. I wanted it shorter so I could add a leather
cover down the road. The top of the comb
is narrow and a bit low, so a leather cover would make for a more comfortable
cheek weld, and it’s less likely to hang up on my clothes when mounting. The hole spacing was far enough apart that I
had to shorten the top screw to not hit the screw that holds on the remains of
the old buttplate. I also picked up a Wheeler
recoil pad jig. While most people would
be happy just covering the stock with a leather wrap and calling it a day, it
would bug me if I knew I was hiding a hackjob underneath. I used the belt sander up to the scribe line,
then hand sanded with 220 grit and furniture polish. Considering I'd never fitted a recoil pad before, I think it turned out pretty well.
 |
| Shotgun style buttstock |
The only thing I haven’t done is purchase a magazine tube
liner or “alignment kit”. Uberti uses
the same tube on their .357 rifles as the .44 and .45LC models. The oversized tube allows the .38/.357 rounds
line up crooked inside the tube which can cause a hitch when feeding the first
few rounds. I haven’t noticed a hitch or
any appreciable speed difference from first to last round that isn’t a just a
result of the spring pressure in the magazine tube. However, if my rifle had come from the factory with a rusty spring, I'd have gotten one since alignment tubes include a stainless steel spring and follower.
Now all that was left to do was practice. I cued up a few westerns on Netflix, and
started dry firing. I picked up a
lightened firing pin and spring, and use the factory firing pin for dryfire
only.
So what did all this effort get me? Can I complete a “Nevada Sweep” in under 2.5
seconds with sub .20 splts? Of course
not but maybe someday. I didn’t build a
“race gun” to compete, at least not yet.
But I wanted to have the best example of a lever gun I could while
staying somewhat true to the original. My
goal was to build something I could have fun with. Part of that fun is the build itself. I did a ton of research, learned a lot, and
met some nice people along the way. I
also have a greater appreciation for the people who managed to design and build
such a beautiful rifle 150 years ago.
They engineered by oil lamp, not an LCD screen. They learned by doing, not a Google
search. They built rifles for people who
would forge their own path through the frontier. The fact that the rifle lives on today is a
testament to those people and the spirit of the American West.


I genuinely enjoy reading your article ,great things you have always shared with us. Just keep writing this kind of post, it's really informative blog.
ReplyDeleteClick here
Next page
Fantastic Post! Lot of information is helpful in some or the other way. Keep updating
ReplyDeletecheck out more bluing kits for gun
Great write up and thanks for the details! Time to put on some westerns and order some parts.
ReplyDelete