I’ve never been much of an artist. I can Photoshop a meme or two, but I’ve never
been able to create anything outside of the digital realm. My handwriting is atrocious, and anything I
draw looks like something you would stick on the fridge to appease a 4-year
old. So when I decided I wanted more
grip than a factory Gen4 Glock 19 could offer, I was conservative in my
approach. After some planning, I picked
up a 25-watt woodburner and a 20lpi waffle tip from OTDefense. The result was functional, and while I wasn’t
overly concerned with aesthetics, I didn’t want it to look like a hack
job. My second attempt on my Gen4 Glock 26
was a bit more audacious. I used a
vertical mill to cut Agency Arms style thumb ledges, removed the finger
grooves, and undercut the trigger guard.
I opted for a more time consuming but EDC friendly micro-dot pattern.
DIY 20 LPI
DIY Micro-Dot
From a functional standpoint, micro-dot is great for EDC,
and provided excellent grip during a rainy vehicle defense class. However, the pores quickly filled with red
Georgia clay, which was a chore to clean out.
As the round count increased over several months, I also found myself
touching up a few areas that had worn down from use. I also wanted to try my hand at cutting
borders to give my amateur work the look of a professional job. After ordering a few high speed cutting bits
for my Dremel, I attempted to practice cutting borders on a scrap frame. It went poorly.
Last Spring, I ran into Will McElise of MAC Defense Ind. at
a Sage Dynamics Defensive Handgun class.I brought my G26, as well as two nearly identical G19s, aside from a few
slide machining variations and frame color.Both had RTF2 frames, which I consider the best factory texture on any
handgun thus far.I also prefer the
extra circumference of the grip tang over the gen 4/5, as it gives me better
trigger finger placement.After
listening to my wishlist, he pulled out a few of his frames to examine.I was immediately impressed with his
work.After a few more questions, I
stripped my G19s, handed him my frames, and headed home with just my G26 for
company. While some RTF2 fans might
consider this sacrilege, the RTF2 texture does not extend to all the areas
where my hand contacts the frame, and there are smooth gaps between the sides
and front/backstraps.
RTF2
One thing that always prevented me from sending my frames to
a professional were the hassle of shipping firearms and the wait time. Some of the outfits known for good work can
have lead times ranging from six to an eye watering 12 weeks, and I’m not the
most patient man. Fortunately, Will had
my frames back to me in just under three weeks.
It would have been worth the wait at triple that.
Aesthetically, the MD2 Hybrid package looks beautiful.The smooth rear tang allows the web of my
hand to slide deep into the beavertail, allowing a high grip as I index the
frame.The “accelerator” cuts are
textured on the inset portion above the ledge.Some places texture the bottom portion, leaving the cut section
smooth.Will prefers to stipple on the
upper portion since that’s where your thumb actually rests, and I’m inclined to
agree with his logic.However, I don’t really
put that much downward pressure on the ledge and use the cut as more of an
index point.I also like how the lines
blend with the angles of the rest of the pattern.
Sprinkles
BrainMatter
Will also reduced the “hump” on the
backstrap.Unlike other Glocks, the
texture nubs on RTF2 frames stick out above the surface, instead of being
molded into it.Will removed some of the
material at the hump, to match the profile of a Gen3/4 frame after removing the
texture blocks.Combined with the double
undercut, the gun points a bit lower, but more naturally than before.Removing the finger grooves is an industry
staple.I actually don’t mind them, but
removing them does let my hand get farther up on the front strap, nestling nicely
in the smoothly undercut trigger guard. Will thoughtfully uses a milder texture on the trigger guard to spare your support hand knuckle.
Trigger Guards
For Gen3s, MAC offers a frame scallop around the mag
release.I tried my hand at this before,
and even with the help of a vertical mill, it came out looking uneven.The MAC scallop is clean and smooth, allowing
me to easily press the factory mag release without shifting my grip.I still use an extended Agency mag release,
but if I didn’t already have it, I’d be happy with just the OEM length part.
Mag Scallop
While both guns are similar, I decided one would be setup
for carry, and the other for training.
For carry, I decided on the “Brainmatter” texture. It offered similar grip to microdot, with the
added benefit of being less likely to accumulate dirt or dead skin cells over
time. It also doesn’t grab at my cover
garments as much. For my training gun, I
opted for the “Sprinkles” texture. This
offered a higher level of grip, although I’ve since run it in classes AIWB
without any discomfort. It does tend to
snag on soft fabrics and would poke holes in loose knit fabrics in short
order. One option MAC offers is to
provide different levels of texture for each pattern. He can soften the chosen texture a bit by
knocking down the sharp edges with hand sanding for EDC(light) or Duty(medium),
and no sanding for Comp(aggressive). I decided
on Duty for both since I knew the texture would naturally wear down with use. According to Will, the sharper edges of Sprinkles
will wear down a bit more than Brainmatter.
After seven months, two classes, and a few thousand rounds of ammo, I’d
say that was accurate. Brainmatter feels
pretty much unchanged. Sprinkles isn’t
as rough on my hands, although maybe my hands have toughened up, but both still
provide excellent grip in less than ideal conditions. If I had to choose just one, I’d pick Sprinkles
with the EDC or Duty level of texture.
While not as comfy as Brainmatter, it provides more consistent traction. Both are grippy, and you can still adjust
your grip on the fly if you don’t get a perfect one on the draw.
Finally, let’s talk borders.I’ve seen some amazing border jobs but with that beauty often comes a
small sacrifice in function.Thick,
deep, smooth borders look nice, but in my mind, that’s 1/8” of space
that could be textured.MAC minimally cuts
the borders, then adds a single row of microdot stippling up to the edge.He then fills everything out with the
requested texture.This extra step looks
great and maximizes every bit of available grip.It’s a subtle touch, but I appreciate the
extra time spent on such a small thing.It’s
plainly evident that Will has spent a great deal thinking about maximizing
performance without giving up anything in the looks department.He gives the same attention to even small
details that might otherwise go unnoticed.
One thing I didn’t do was Cerakote.While it can result in some gorgeous frames,
changing the color wasn’t a requirement for me, so I skipped it on the order
forms.
When I decided to build a Gen3 G34 for USPSA Carry optics, I
knew exactly where to send my frame.I purchased
a G17 frame from BigTexOutdoors and had it shipped straight to MAC Defense.The G34 slide went straight to Jagerwerks.After a few emails and some feedback from
Tyler at Modern Outdoor Adventures, I decided on the same MD2 Hybrid package as
before, but with the experimental “Swamp Donkey” texture.After a few weeks, he shipped it to my FFL so
I could take delivery.I have no idea
why it’s called Swamp Donkey, but it’s aggressive as hell and perfect for
competition, class, or duty carry.It’s
insanely grippy and positively locks the gun to your hand, even with an
intentionally weak grip.You had better have
a proficient draw stroke, because once you clear the holster, whatever grip you
get is what you’ll have without peeling your hand off the gun.Everything else is exactly what I expected
from MAC Defense, from the crisp border lines to the frame cuts and stippling
consistency.Even if the stippling wears
down to half its original grip level (unlikely without a belt sander) it will
still be leagues above most “duty” stipple jobs.The only grip I’ve felt with more traction is
the Armor stipple from Agency Arms, which feels like crushed glass.It’s actually painful to grip, and I can’t
imaging carrying it against bare skin, although I know of some masochists that
do.
Swamp Donkey
Sending a gun off to get worked on is not a decision to be
taken likely.A slick Instagram feed is
one thing, but it’s another matter to actually put thought into how a product gets
used versus how many likes it can get.Will
at MAC Defense takes immense pride in his work.You can sense it in the way he describes his processes, and how he’ll
answer any question you have.Whether
you want to address specific shortcomings of your gun, need a bad stipple job
fixed, or just want to “Gucci” up your blaster, you won’t be disappointed with
MAC Defense.
Unscientific “Grippy-ness” Index:
OEM Gen3 – 2 (meh)
OEM Gen4 – 3
OEM Gen3 RTF – 4 (nice)
DIY Micro-dot – 5
MAC Brainmatter – 5.5 (great for EDC)
DIY 20LPI Waffle - 6
MAC Sprinkles – 6.5
MAC Swamp Donkey – 8 (as aggressive as can be without
causing pain)
When I found out that Aaron Cowan of Sage Dynamics was teaching
a force-on-force class about 30 minutes from my house, I jumped on it.Citizen Response to an Active Shooter was
hosted at ForceTEC in Cleveland, NC.The
site was originally an old school, then a YMCA, before being bought by ForceTEC.
Day one started at 9am.I brought donuts.Buzzing from
sugar and caffeine, the mood started off light but quickly changed.Aaron played a 16 minute video of the entire Columbine
school shooting with 911 audio spliced in.Personally, I hate watching stuff like this.The same goes for horror/slasher movies.I’m fine with war/crime movies, or videos of
bad guys getting smoke checked, but hearing the screams of innocents disturbs
me far more than seeing people killed on screen.I wanted to reach through the TV and strangle the two pieces of shit, strolling around and casually pumping rounds into victims.Everyone in the room shared the same
conviction.
With the seriousness of what we were training for
established, Aaron spend the rest of the morning going over active shootings,
more specifically the shooters and how we deal with them.The common aspect was how motive was academic
and that the only profit in an active shooting was causing death itself.He did a section on critical anatomy which
was familiar to anyone who has taken his classes before, or watched his videos
on the subject.The next block was on
how our bodies respond to stress in a life threatening situation.I experienced everything he talked about once
the scenarios were underway.Tunnel
vision, time distortion, increased respiration and heart rate, the
uncomfortable almost electric feeling of adrenaline, and how this would all
lead to the degradation of my shooting and problem solving skills.Finally, he went over the Simunition system.He provided us with ammo, a sims converted
AR15, and four sims converted Glock 17s, one with an RMR.He went over safety and the limitations of
sim weapons, including an accuracy check.We broke for lunch, and returned to the classroom after sanitizing ourselves
of guns, knives, and car keys.
From Sage Dynamics Instagram
After double checking ourselves for real weapons, we donned
our protective gear (masks, neck bibs, padded vests, long sleeves, gloves, and groin protection) and were
broken up into three groups of four. One
group consisted of role players, one was the bad guys, and one was the good
guys. The good guys were separated from the rest of us for each scenario, and wouldn’t
know who the bad guy or guys were or how the scenario would start. The bad guy(s) wouldn’t know who the good guy
was either. The scenario was repeated
until all four members of the good guy group had finished, and then a new
scenario was setup for the next group.
For the first day, the scenario was in a doctors office. For one group, the good guy started in the
back exam room, and the bad guy entered the lobby and started shooting.
For my scenarios, I was equipped with the RMR'd G17 and attached my TLR1-HL.I used my EDC holster and mag carrier.The only real difference
to my EDC Glock 19, was that we couldn’t load the magazine past 13 rounds or
the guns would malfunction. The bad guy
started in the exam room, and started shooting shortly after I checked in with
the receptionist.One of the artificialities
of sims is knowing that something is going to happen.I walked in much more alert that I’d normally
be.The other role players would try to
distract me with questions, arguments, or simply positioning themselves
uncomfortably close.My eyes were
darting all over the room and I'd probably be seen as a madman if I’d been
acting that way in real life.I heard a
shot from the rear and moved toward it with gun drawn. The people in the waiting room ran in front of me toward the exit, two men ran toward me from the hallway, and I
had to quickly identify them as threats or not. I yelled for them to show me their hands.I only remember seeing their hands and body language.Unfortunately, it’s impossible to read facial
expressions due to the masks.I saw a
figure emerge from the back room.Even
with adequate overhead light, I couldn’t make out the blue gun in his
hands.I didn’t think to activate my weapon
light.I heard his first shot, saw the
muzzle flash, saw a nickel plated shell bounce off the wall, and felt something
hit my shin.I shot before I had my arms
at full extension, finally seeing the red dot on his chest after what felt like
an eternity.I tracked and shot him to
the ground, then moved in to secure his weapon.Attempting to clear it one-handed with gloves on did not go as smoothly
as I’d hoped.I also didn’t think to top
of my gun with a fresh magazine.I had
fired 11 of 13 rounds but didn’t remember shooting that many.With the shooter down, I yelled “Call 911!”
to no one in particular, and I felt stuck, trying to think of what to do next.I was concerned with possible threats down
the hall, when I should have improved my position and started considering law
enforcement response and rendering aid to the wounded.Reviewing my GoPro video, I was happy to see
a few things I got right.My muzzle and trigger
finger discipline were good, and I instinctively moved toward a bookcase for “cover”.However, the particle board bookcase wouldn’t
stand up to real bullets, my shots were nowhere near as accurate as I can shoot
on paper, and I’d have probably been better served working to my right, using the
wall corner for concealment.I also
should’ve been more specific regarding what information was being relayed to
911. From the time I heard the first shot, to when the shooter was down took less than 9 seconds. The entire scenario was over in 90 seconds.
As a role player or bad guy, it was easy to watch the scene
unfold and know what to do next, but as the good guy, there was immense
pressure to perform and make the correct decisions.While getting shot as the good guy didn’t end
the scenario, it reinforced the idea that gunfights are absolutely terrible.I took one unlucky round to what would have been
my femoral artery.As the bad guy, I was
able to land a few headshots on the good guy, simply because the pressure was
off.One thing I had difficulty with was
shooting innocents though.Even as the
bad guy, I would shoot over their heads or at the floor, only aiming for the
good guy when he presented himself.I
was instructed to go down after a solid head shot, or 2-3 good shots to the
torso.That didn’t mean I had to stay
down.In some cases I chose to “bleed
out” while in others I kept fighting from the ground.Once the scenario played out, Aaron would call
“out of role”, and then let the student explain what he saw and his
actions.Aaron would provide insight
into what was done well, why, and what needed to improve.His feedback was honest and direct.He didn’t sugarcoat our mistakes, but wasn’t overtly harsh either, even with the students who had shot the wrong people.We all understood that failure was an important part of learning, and that no one could be harder
on us than ourselves.By the end of day
one, we all had a few welts and bruises, and a few band-aids were applied.The running joke is that in sims you get
stung by bees.Mistakes made in
force-on-force became solid lessons.I didn’t
realize how much more I had to learn, and we still had another day to go.
After class, most of us returned to our respective hotels,
showered, and met up at a local chain restaurant.We ate, swapped stories, and talked about our
experience in class.While many of us
had just met, we spoke like long time friends. One of the local alumni even joined us for dinner even though she couldn't attend the class. This has always been a constant at Sage classes.Sage Dynamics students make up some of the best people
and shooters I’ve had the pleasure of meeting.
The next day started like the previous afternoon.We stripped ourselves of weapons and jumped
back into scenarios.Yesterday was “training
wheels”.The complexities would increase
today.Multiple shooters and the rifle
were now in play.If getting hit with
pistol sim rounds felt like bees, the rifle felt like wasps.We started in the cafeteria which was laid
out like a small café.As a bad guy, I
got to try out my acting abilities.I
was to sit down, and act like a guy trying to psych himself up.Nothing too dramatic, but enough to catch the
attention of someone paying attention.I
got up, walked to the counter, drew the handgun, and “executed” the cashier.I then started firing indiscriminately until
I saw the good guy draw his gun and emptied my magazine toward him managing to hit him in the mask.I ran behind the counter, reloaded and popped
up like a lunatic, spraying his cover(concealment), while stepping out from
behind the counter.I felt a few hits to
my chest and fell backward to the ground firing as more rounds snapped into the wall behind me.My gun locked empty as a volley of rounds hit
my thigh and head.The good guy
recovered my weapon, directed people to call 911, identified himself as the
good guy, and got people to the exit when Aaron called the scenario.Even as the bad guy, I learned from each incident.I saw how easy it was to get pinned down, and
how foolish leaving cover for the sake of aggressively attacking could be.On the flip side, my initial hail
of gunfire gave me a huge advantage until I ran out of ammo.I saw how getting to behind cover/concealment
first might be a better option than going straight to your gun, and how
aggression can briefly regain the initiative.In this way, force-on-force gives you a way to experiment.There were some situations where we might be
more likely to just sit tight or even retreat in real life.In FonF, you can take chances you normally
wouldn’t take, gaining valuable insight.
In my scenario, I heard a shot outside the restaurant and
immediately drew my firearm.With no
threat present, the role players reacted to me like I was the bad guy.I now had to deal with an unruly and
frightened crowd for what felt like minutes.In reality, about 10 seconds later, the shooter appeared in the back doorway dual wielding
a rifle and pistol.My first few rounds
hit him square in the chest and I drove him back out the door.This time I reloaded from slide lock, used my
light, and held the corner.My reload
was awful.I grabbed the mag backward
and felt like I was moving underwater.I
moved to better cover, and when he reappeared, I shot him several more times,
tracking his head to the ground.I was
more assertive this time, directing individuals to tend to a wounded man, and
another to call 911, before directing everyone who could walk to escape, and
then call 911 myself.After ending the
scenario, we talked about how I had pulled my gun unrealistically early had
this been real life.A single loud noise
this close to 4th of July could just be a firework, car back firing,
or if indeed a shooting, an isolated incident.Without a clear threat, I should have made my way to a better position
before clearing my gun, but I had “gamed” the scenario.
In another scenario, I was instructed to enter a hotel lobby
with the rifle, with a second shooter a few seconds behind me.As I was being engaged by the good guy, he
was so focused on me that he didn’t check the direction I came from down the hall,
and was shot in the back eight times by my accomplice.In another, one student didn’t hear Aaron
identify himself as police and engaged him in a shootout.In two other instances, a hostage was shot by
the good guy.We took every one of these
lessons to heart.One big takeaway was
after a student initially engaged the shooter, drove him into a room, backed
off, and waited.There was no pressing
need to move forward and take down the shooter.We were reminded that our goal is to deny the shooter access to more
victims.Obviously, incapacitating the
threat is a great way to accomplish this, but just stalling them can also save
lives until help arrives.
In my last scenario, I was in line for a movie when someone
opened fire on the cashier.I moved to
my left to clear the line of bystanders, but they all moved as well, crowding
around me and blocking my arms.I found
out later they were told to do this to see how I’d react.I pushed the guy in front of me down and shot
at the shooter one-handed, before getting my support hand on the gun, activated
my light, and shot him to the ground.At
slide lock, I spun away as I backed down the hallway, checking behind me while reloading.I fumbled the magazine against my vest and
dropped it on the floor.Cursing, I got
my gun back into action, and made my way back to the shooter who was now seemingly
deceased.I slid his gun away, then
looked up and down the hallway convinced there would be a second shooter. I forgot to secure the weapon which was now laying next to the sims rifle which I also never saw. I moved back into the hallway and backlit myself to the entryway behind me, a
ripe target if someone had been there.I
assessed for wounded, yelled for 911 to be called, and finally improved my position before
calling 911 myself. Scenario over, the bad guy
commented on how my light temporarily disorientated him even under the normal
lighting conditions.Score one for having
800 lumens.Reviewing my GoPro, I never
saw the innocent man running behind the shooter.While I didn’t hit him, I could have just as easily
done so.While I scored multiple hits, I
have no idea which of my shots were on target.Just as before, I can’t recall seeing my dot until after I started
shooting, and my one-handed shooting felt slow, like I was dragging my fingers through concrete.
The class came to an end shortly after. We were excited to learn that Aaron would be returning some time early in 2019. He encouraged us to continue training, but to seek out instructors other than himself. Red patches were handed out, one of which I received, and the coveted Black patch went to the top student. With real-life fast approaching, we all headed out. I spent the next few days decompressing, and as mentioned before, it took a few days for some of the lessons to fully sink in.
Bite mark from a rifle wasp.
Many of the things I learned I already knew, but
experiencing them first hand reinforced them. The adage of gunfights lasting 3-rounds, 3-feet, and 3-seconds is B.S., as is having too many lumens. Nobody wished they had fewer rounds or less light once scenarios kicked off. I learned how hard wired I am to not hurt people who don’t deserve
it. Even while playing a bad guy I felt
conflicted. I had to shoot one person
point-blank in the chest to start a scenario.
Even though he was wearing a thicker vest and wouldn’t even feel the
shot, I hesitated for a split second. I
had no qualms about shooting the bad guys multiple times in the face
though. I learned that I need to improve
my one-handed shooting, smooth out my reloads, and work on my accuracy at
speed. I learned first hand how quickly
an incident can occur, and how little time there is to actually think. I learned how my mind and body react to stress, and that I can work through it. I
never once saw my iron sights and I still default to high center chest shots instead of the head at close ranges where headshots are possible. My fine
motor skills didn’t so much degrade as they were overridden by an intense desire
to be fast. My movements felt sloppy and frenetic. Quick draws from concealment
are great, but getting in a better position may help you live longer. In a perfect world, we’d see the shooter and
take him down before he fires a single shot.
The reality is much more sobering.
The shooter probably won’t make himself known until it’s too late to
save the first victim(s). In one
scenario, the good guy was shot in the back at the very start. It also gave me insight on how a potential bad guy might carry out an attack. As I participated in the next weeks 4th of July festivities, I found myself taking just a few seconds to take note of my surroundings and who was around.
My GoPro proved invaluable.While I forgot to turn it on a few times, being able to review most of
the scenarios allowed me to dissect any lessons that could be picked out.Just as Aaron had said, my memory of each
scenario was incomplete, especially in the first 48 hours afterwards.Having the GoPro video made it easy to piece
together what I did right and wrong.The
other students and I shared our videos freely with each other.
The class also reshaped my understanding of violent encounters.Whomever brings the most violence the fastest
usually wins.Violence itself is not a
bad thing.It’s simply a
description.A tornado is violent but
doesn’t carry the evil connotation society has given it.Being able to focus an unholy amount of
violence onto a bad person is something that needs to be practiced ahead of
time.Just thinking about it isn’t good
enough.Saying how you’re going to hit a
home run isn’t the same as actually swinging the bat.
A force-on-force class should be taken as soon as possible
by anyone once they are proficient with their defensive handgun.FonF is both a laboratory and a proving
ground.I can’t think of a single
live-fire class where I’ve learned more about myself as a shooter and as a person.
Last fall I flew to South Florida for Sage Dynamics’ Home
Defense class. Flying commercial meant
buying an appropriate case to transport my firearms and accessories. Considering that I’d have the monetary equivalent of a gently used Civic in the
case, I wanted to keep everything as organized and protected as I could. After fumbling with the usual DIY methods, I
discovered the semi-custom foam inserts from Eaton Tactical Innovations. I wrote about my experience with them here: Eaton Tactical Innovations - Pelican 1720 V3 Foam Case Insert
Fast forward a few months, and I had signed up for another
Sage Dynamics class.This time,
Defensive Rifle with Jon Dufresne.Located at the Ross Lake Plantation in Georgia, I’d be making the trip
via a 7-hour car ride.I planned to pack
my dedicated practice/training pistol, my suppressed 11.5” SBR and a 14.5”
upper.I would mainly use the SBR for
night vision shooting/pig hunting and swap to the 14.5” upper for the
class.Looking at my Pelican 1720 case,
I figured it had enough room for everything to fit with the right insert.Browsing ETI’s website, I noticed a lot more
foam configurations for Pelican cases, as well as Pelican Storm and more the budget
friendly Plano cases.The inserts are
now known as Gunformz, and they have also expanded their lineup of inserts for
the bottom foam layer, for magazines and pistols.I found the 1720 V14.It features a main compartment for an
assembled 14.5” or longer rifle, a cutout for an 11.5” or longer suppressed
upper, one pistol cutout, and various pockets for accessories.This was nearly exactly what I needed.
Gunformz AR 1720 V14
I received the insert in under a week.I removed the insert from its black plastic
shipping bag, grabbed a thin bladed utility knife, and began freeing the
sections of foam from their cutouts.After a bit of trial and error, I had trimmed a few sections manually to
account for my rifle rails, pressure pads, and muzzle devices.I thenfilled the remaining compartments with a spare pistol mag, pistol
suppressor, sling, muzzle blast shield, and my Dbal A3.I did however run into a small snag with the
pistol cutout.I neglected to take a
close look at the position of the pistol slot.It’s very close to the top of the insert, with no room for slide mounted
optic.This wasn’t a huge deal since I
was driving, but if I was flying commercial I’d have had to pack my pistol with
a checked bag.
Checking ETI’s website and found a 1720 bottom layer
insert, the ARBL 1720 V2.It holds 5
rifle mags, 5 pistol mags, and optic equipped handgun.Unfortunately, I was leaving in a day, but
placed the order knowing I’d need it in the future.
Once I had everything in its place, I had some difficulty
closing the case.The rifles are wider
than the thickness of the top foam.While I did cut pockets to clear my rifle mounted lights in the factory lid
foam, having the second upper near the latches required pressing hard on the
lid to close the latches.The last thing
I did before leaving was order a replacement convoluted (eggcrate) foam panel
for the lid.
All day Saturday, the foam was exposed to the Georgia heat
and humidity.We were constantly
brushing off the loose, sandy soil from the range mixed with sweat, sunscreen,
and bug spray (OMG the gnats!).Day two
ended with heavy rain.I was thankful
for the non-moisture absorbing closed cell foam and remembering to bring a pair
of beach towels.(It always rains at
Sage classes.)
Blasters
I returned from the class late Sunday night, and my wife
(probably rolling her eyes at yet “more gun s**t”) had left the 42” long black
plastic package in my office.I noticed one
change from my current bottom foam insert.The rifle mag cutouts are precut for 30-round AR15 magazines as well as
larger AR10 magazines.Since I now run
compensators on my pistols, I did have to enlarge the pistol cutout, but I had
to do the same on my V3 insert.At least
with my configurations, the pistols aren’t directly under any of the wider
parts of the rifles, so I don’t have to worry about the optic buttons getting
pressed.
Gunformz ARBL 1720 V2
Once again, I’m impressed with not only the performance and
durability of the inserts, but at 1/5 the cost of a custom insert, the value is
excellent.At $64.99 on Brownells, the
cost is comparable to a solid replacement foam piece and a hot wire cutter
without any of the hassle.And now that
these are available for inexpensive Plano cases, I’m going to pick up a lighter
duty 36” Plano rifle case for general range and road trip use.
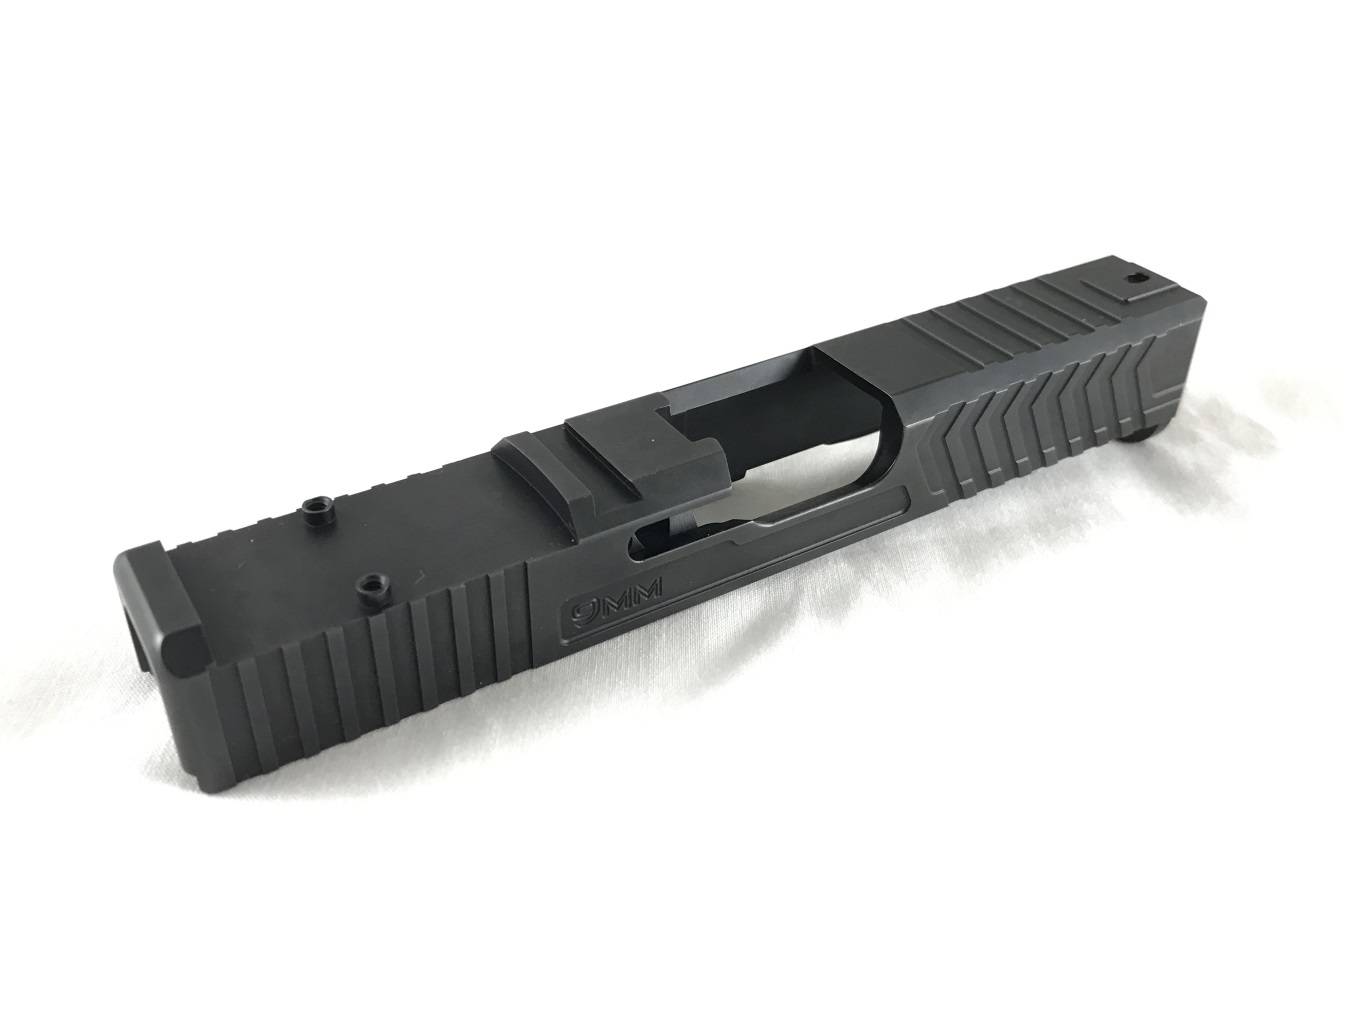
Fourteen weeks. That's how long my slide was gone. But before you conclude that that's an awfully long turn around time for some slide work, BattleWerx was in the middle of moving their entire operation to a new building. I also specified a black nitride refinish, which typically adds up to three weeks no matter who you send it to. They contacted me right after I placed my order to let me know there would be a delay. I wasn't in a hurry, so I boxed up my gen4 G19 slide and shipped it off.
Last year I attended Sage Dynamic's 2-Day Vehicle Defense class. Shortly after drooling over some of the other students guns, I decided I wanted a no-compromises gun for training and EDC. As much as I liked my Unity Atom slide, I knew a dedicated milled slide would position the RMR lower and further back on the slide, reclaiming some of the lost sight radius when mounting irons forward of the optic. I also wanted more than five lines of front serrations and a more robust finish. While I've had excellent results from JagerWerks (four slides so far) BattleWerx sprung up on my radar when they introduced their anti-flicker plate for the RMR. A raised boss on the plate mean I don't have to use electrical tape, hot glue, foil shims, or any other other remedies to prevent my RMR dot from flickering if the battery shifts. They only have four slide packages. Battle Slide and three flavors of Gripper. While all are functional, the Battle Slide looks fantastic while doing so. One key difference between the BattleSlide cut and the others is the way the cuts are milled. Instead of a square endmill which leaves perfect 90 degree corners, the BattleSlide is cut with a radiused end mill, leaving a profile more like a table-top ramp. You can see a close-up of the profile below.
Serrations milled with a radiused bit.
The result isn't as sharp or aggressive as traditional square cut serrations, but the forward raked chevrons provide plenty of grip. While the slide corners are chamfered, they still allow my Safariland ALS holster to lock on the ejection port corner, and the trapezoidal cross section of the top serrations allow the ALS hook to glide over them instead of catching on them and getting worn down.
Another difference is the method in which they secure the RMR to the slide. Most RMR cuts are designed to secure the RMR at the front and rear of the body. Though commonly used, two raised bosses at the front of the pocket are unnecessary since the recoil forces are distributed by the body of the RMR. BattleWerx and a number of other companies instead mill raised indexing posts that are threaded for the RMR screws. This allows the pocket to be cut deeper while also providing more threads for the screws to engage. This allows the BattleWerx RMR cut to be 0.020" deeper than the traditional method. This moves the RMR closer to the boreline, fractionally reduces weight, and compensates for the .010" thickess of a sealing plate. The RMR and sealing plate are easy to align due to the threaded posts as well during installation. A drop of Loctite and firm turn of the allen wrench are all that's needed to lock down the included mounting screws.
The black nitride finish is perfect. While the nitriding is outsourced, the preparation is not. The flats and edges are sanded by hand to ensure no burrs or milling marks. The slide arrived with a new striker channel installed. I completed it with a Blacklist barrel, 10-8 sights, and OEM internals before reuniting it with my frame. Racking the slide, and feeling how smooth it glides over the rails and trigger connector, I decided I would probably never Cerakote my slides again. Cerakote can add more thickness to a treated part than nitride. This was most evident at the breechface and striker plunger hole on some previous slides. The barrel and plunger would hang up slightly until the Cerakote wore away. While Cerakote supposedly provides more corrosion resistance, nitride is tougher and more innately slick. The gun cycles when dirty and bone dry, even with a full sized suppressor.
I've run this gun as my EDC, training, and HD gun. It's sighted in for standard pressure 147 Gold Dots at 15 yards and has run a few thousand runs of Lawman 147 and 115 AE without a single problem. Last fall, I ran it hard along side my CZ P-10C and PWS MK111 at Sage Dynamics Defense in the Home with boring consistency. Recently, I added Agency Arms new 417 compensator and experienced follow-up shot nirvana.
HD setup. Reliable with stock recoil spring.
Fast forward to today, and I have another slide on its way to BattleWerx. I recently became enamored with Glocks gen3 RTF2 frame. I had one done by JagerWerks (Yeti package), but my second slide and Ameriglo GL-429 sights are heading straight to BattleWerx for their Gripper package with RMR cut (irons forward) and of course, black nitride. I chose the simpler Gripper package because I didn't want top serrations to interfere with my ALS holster (they are cut square on the Enhanced Gripper) and I found myself using the rear sight/RMR body to manipulate the slide anyway. I still wanted front serrations, just in case, and to offset some of the additional RMR weight. Fortunately, BattleWerx has completed their shop move, so lead times are back down to normal. I should only have to endure a five to six week wait. Until then, I have my BattleSlide to keep me company.